Charcuterie Board: An Incredible Ultimate Guide with 7 Tips
Charcuterie Board is an amazing way to elevate your entertaining game. With a vibrant array of meats, cheeses, and fresh produce, a well-assembled charcuterie board can become the centerpiece of any gathering. It’s not just about food; it’s about creating an experience. Charcuterie boards offer a visual feast while tantalizing your taste buds, making them perfect for any occasion, whether it’s a casual get-together or a more formal event.
Mistakes can happen when you’re trying to impress with a charcuterie board, but don’t worry! With a bit of guidance, you can craft a stunning board that will wow your guests. In this comprehensive guide, we will explore everything you need to know about creating the perfect charcuterie board—from the essentials to tips and tricks that ensure success.
Much like art, assembling a charcuterie board requires creativity and attention to detail. Every item you choose contributes not just flavor but also texture and color. The end goal is to create a balanced and inviting platter that encourages mingling and enjoyment. Let’s take a closer look at why you’ll love preparing a charcuterie board, how to get started, and how to serve it for maximum impact.
Why You’ll Love This Recipe
Creating a Charcuterie Board is a delightful experience, and here are several reasons why you’ll fall in love with it:
1. Customizable: You can easily tailor your board to suit your guests’ preferences, including vegetarian options or allergen-free selections.
2. No Cooking Required: Most ingredients are ready to go, meaning you can skip the time spent slaving away in the kitchen.
3. Visually Stunning: The vibrant colors and varied textures create an appealing presentation that captures attention.
4. Encourages Social Interaction: Sharing a charcuterie board encourages guests to mingle and try different combinations of flavors.
5. Versatile for Any Occasion: Whether it’s a picnic, a holiday party, or a casual get-together, a charcuterie board fits right in.
6. Delicious Flavor Combinations: The myriad of meats, cheeses, fruits, and nuts create endless possibilities for flavor pairings.
7. Easy to Prepare: With clear guidelines, even novice hosts can assemble a fantastic charcuterie board.
These factors combine to make a charcuterie board not just a platter of food but a shared experience of flavor and fun.
Preparation and Cooking Time
Preparing a delightful Charcuterie Board takes relatively little time, making it even more appealing. Here’s a breakdown of the estimated time you should set aside:
– Preparation Time: 20-30 minutes
– Assembly Time: 15 minutes
– Total Time: Approximately 35-45 minutes
This efficient time frame allows you to create an incredible spread without taking up your entire day.
Ingredients
Here’s what you’ll need to create a stunning Charcuterie Board:
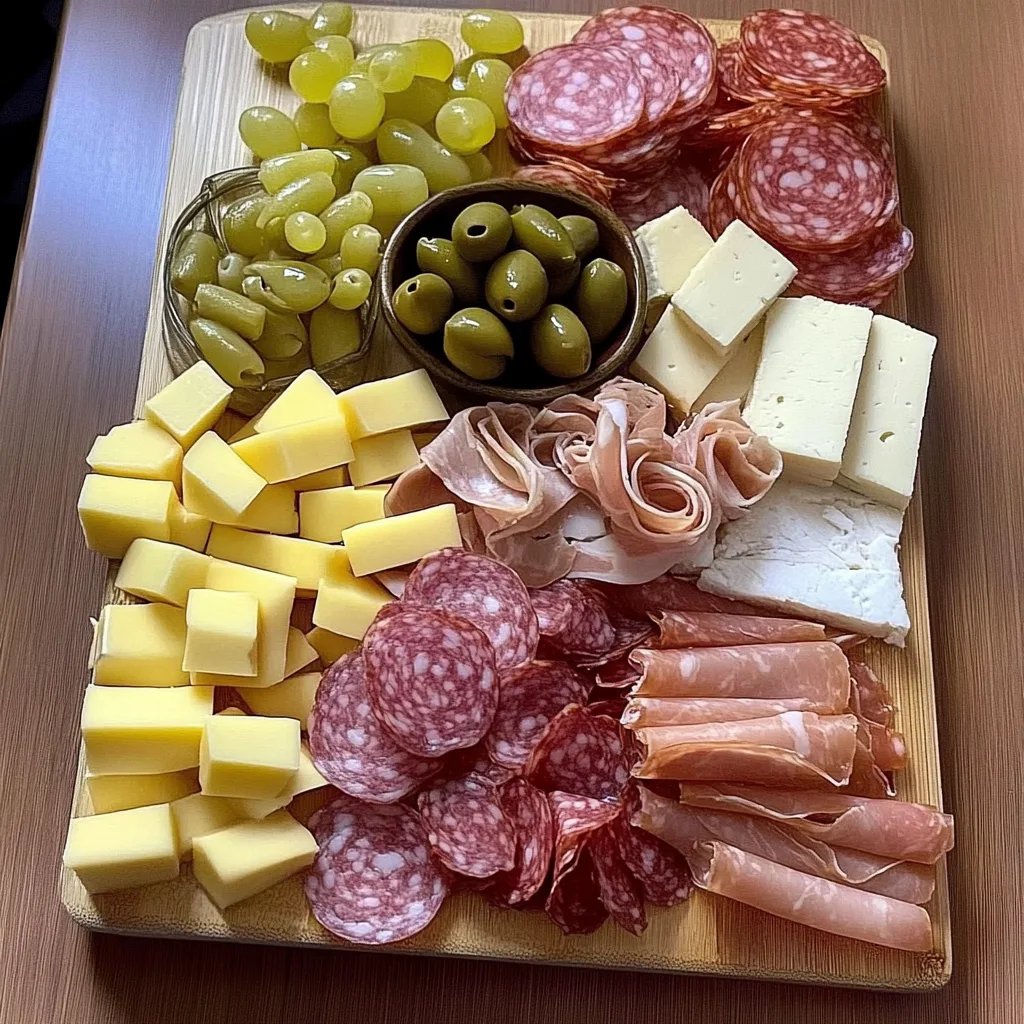
– A selection of cured meats (e.g., prosciutto, salami, chorizo)
– Variety of cheeses (e.g., cheddar, brie, goat cheese)
– Fresh fruits (e.g., grapes, figs, apples)
– Dried fruits (e.g., apricots, dates)
– Nuts (e.g., almonds, walnuts, pecans)
– Spreads (e.g., hummus, mustard, honey)
– Crackers or bread (e.g., baguette slices, artisan crackers)
– Pickles or olives
– Fresh herbs (e.g., rosemary, basil, or edible flowers for decoration)
Feel free to mix and match based on your preferences and dietary restrictions!
Step-by-Step Instructions
Follow these straightforward steps to create an impressive charcuterie board:
1. Choose Your Board: Start with a large wooden board, marble slab, or a platter that fits all your ingredients.
2. Select Cheese: Cut cheeses into bite-sized pieces or wedges. Arrange them around the board for easy access.
3. Add Meats: Roll or fold the cured meats and place them next to the cheeses, ensuring a variety of textures.
4. Incorporate Fresh Produce: Scatter fresh fruits throughout the board, filling empty spaces and adding color.
5. Dried Fruits and Nuts: Create small piles of dried fruits and nuts around the board for added texture and taste.
6. Include Spreads: Place bowls of spreads like hummus, mustard, or honey in open areas, making them accessible for dipping.
7. Crackers and Bread: Add an assortment of crackers or slices of bread, arranging them so guests can easily reach them.
8. Pickles and Olives: Fill small bowls with pickles or olives and place them strategically on the board.
9. Garnish: Finish off your charcuterie board by garnishing with fresh herbs or edible flowers for an elegant touch.
Enjoy the process and don’t be afraid to experiment with the arrangement until you find what looks best!
How to Serve
How you serve your charcuterie board can enhance the overall experience for your guests. Here are some tips to consider:
1. Use a Large Gathering Location: Choose a sturdy table or island to set down your charcuterie board, ensuring there’s enough space for guests to help themselves.
2. Provide Utensils: Include small serving utensils for spreads, along with toothpicks or forks for easy grabbing.
3. Presentation Matters: Consider adding decorative elements like fresh herbs or flowers to elevate your board’s visual appeal.
4. Make It Interactive: Encourage guests to create their own combinations of meats, cheeses, and spreads, making the experience more engaging.
5. Pair with Beverages: Suggest wine, craft beers, or cocktails that complement the flavors of the board for an elevated tasting experience.
6. Prepare for Leftovers: Provide containers or bags for guests to take any leftovers home, ensuring nothing goes to waste.
7. Be Mindful of Portions: Keep serving sizes manageable. Smaller portions encourage guests to try several different flavor combinations.
Presenting your charcuterie board in a thoughtful way can amplify the enjoyment for everyone involved, turning a simple snack into an unforgettable culinary experience.
With these guidelines, you’re ready to create an incredible charcuterie board that will leave a lasting impression. Enjoy the process, gather your ingredients, and let your creativity shine! Whether it’s a cozy evening at home or a vibrant party, a charcuterie board is always a fantastic choice for any occasion.
Additional Tips
– Use Seasonal Ingredients: Choosing fresh, seasonal fruits enhances the flavor and visual appeal of your charcuterie board.
– Experiment with Textures: Incorporate a variety of textures, from creamy cheeses to crunchy nuts. This makes the board more interesting.
– Keep It Simple: Sometimes less is more. A few high-quality items will often be more effective than an overwhelming variety.
– Label Items: If you’re serving unique or gourmet items, consider adding labels to help guests identify them.
– Clean as You Go: To make the process less stressful, clean your surface and utensils as you prepare.
Recipe Variation
Feel free to get creative! Here are a few variations to consider for your charcuterie board:
1. Mediterranean Twist: Replace cured meats with items like hummus, feta, olives, roasted red peppers, and pita chips.
2. Sweet and Savory: Mix sweet elements like chocolate-covered nuts or honeycomb with traditional savory ingredients for a unique flavor experience.
3. Breakfast Board: Swap out meats for breakfast items like mini pastries, yogurt, granola, fresh berries, and honey.
4. Plant-Based Board: Cater to vegan guests by using plant-based cheeses, spreads, and a variety of colorful vegetables.
Freezing and Storage
– Storage: While a charcuterie board is best enjoyed fresh, any leftovers can be stored in an airtight container in the refrigerator. They should remain fresh for up to 2 days.
– Freezing: Most of the ingredients aren’t ideal for freezing; however, certain cheeses and meats can be frozen for longer storage. Wrap them tightly to prevent freezer burn.
Special Equipment
To successfully assemble a charcuterie board, you may find these tools helpful:
– Large wooden board or platter: A sturdy base for all your ingredients.
– Small bowls: For dips, spreads, or olives.
– Cheese knife: To cut and serve cheese easily.
– Tongs and toothpicks: For guests to serve themselves easily.
Frequently Asked Questions
How can I ensure my charcuterie board stays fresh for longer?
To keep your charcuterie board fresh, cover it with plastic wrap or a large lid if it’s going into the fridge. Keep juicy items like fruits separate until serving.
Can I make my charcuterie board in advance?
Yes, you can prepare some elements in advance. Cut cheeses and fruits can be prepared a few hours before serving, but assemble everything just prior to serving for maximum freshness.
What meats work best on a charcuterie board?
Cured meats are wonderful choices, including prosciutto, salami, and chorizo. Aim for a mix of flavors, from mild to robust.
Can I include hot items on my charcuterie board?
While traditionally charcuterie boards feature cold items, you can include room-temperature items like marinated grilled vegetables or baked cheeses for a warm component.
What are some common mistakes to avoid?
Avoid overcrowding the board, as it can look messy. Additionally, ensure variety in flavors and textures to keep guests engaged.
Conclusion
Crafting the perfect charcuterie board is all about balancing flavors, textures, and visual appeal. With a bit of imagination and the tips provided, you can create a delicious spread that your guests will love. It’s an enjoyable and interactive way to share food and foster connections among friends and family. So gather your ingredients, get creative, and prepare to impress with your charcuterie board. Enjoy the delightful experience of assembling and sharing your creation!