Petit Fours Recipe: An Amazing Ultimate Guide to 5 Delightful Treats
Petit Fours are a delightful and elegant confection that can transform any gathering into a sophisticated affair. These bite-sized desserts, typically coated in icing or fondant, are not just a treat for the taste buds; they are a feast for the eyes as well. With their intricate designs and a plethora of flavors, Petit Fours truly embody the art of baking. In this guide to crafting the ultimate Petit Fours Recipe, you’ll discover not only the steps to bring these sweet delights to life but also the reasons why they will leave a lasting impression on all who indulge.
Imagine serving a beautifully arranged platter of Petit Fours at your next celebration; each pastel-colored square beckons guests with its promise of deliciousness. Ideal for weddings, birthdays, or tea parties, these charming sweets provide a perfect ending to any meal or a delightful treat for afternoon gatherings. Since many of the components can be prepared ahead of time, Petit Fours can also be a manageable yet impressive undertaking even for beginner bakers.
Throughout this article, you will learn not only how to create these mesmerizing treats but also the history and variations of Petit Fours. Delve into preparation tips, useful techniques, and presentation suggestions to elevate your baking game. These delightful confections will surely become a highlight at your next event, leaving an amazing impression on your guests. So let’s dive into the world of Petit Fours and uncover the secrets behind crafting these ultimate sweet delights!
Why You’ll Love This Recipe
This Petit Fours recipe is designed with your enjoyment in mind. From their delightful flavors to their beautiful presentation, here are several compelling reasons why you will fall in love with making these charming treats:
1. Endless Flavor Combinations – You can experiment with various flavors, fillings, and coatings to suit your preferences.
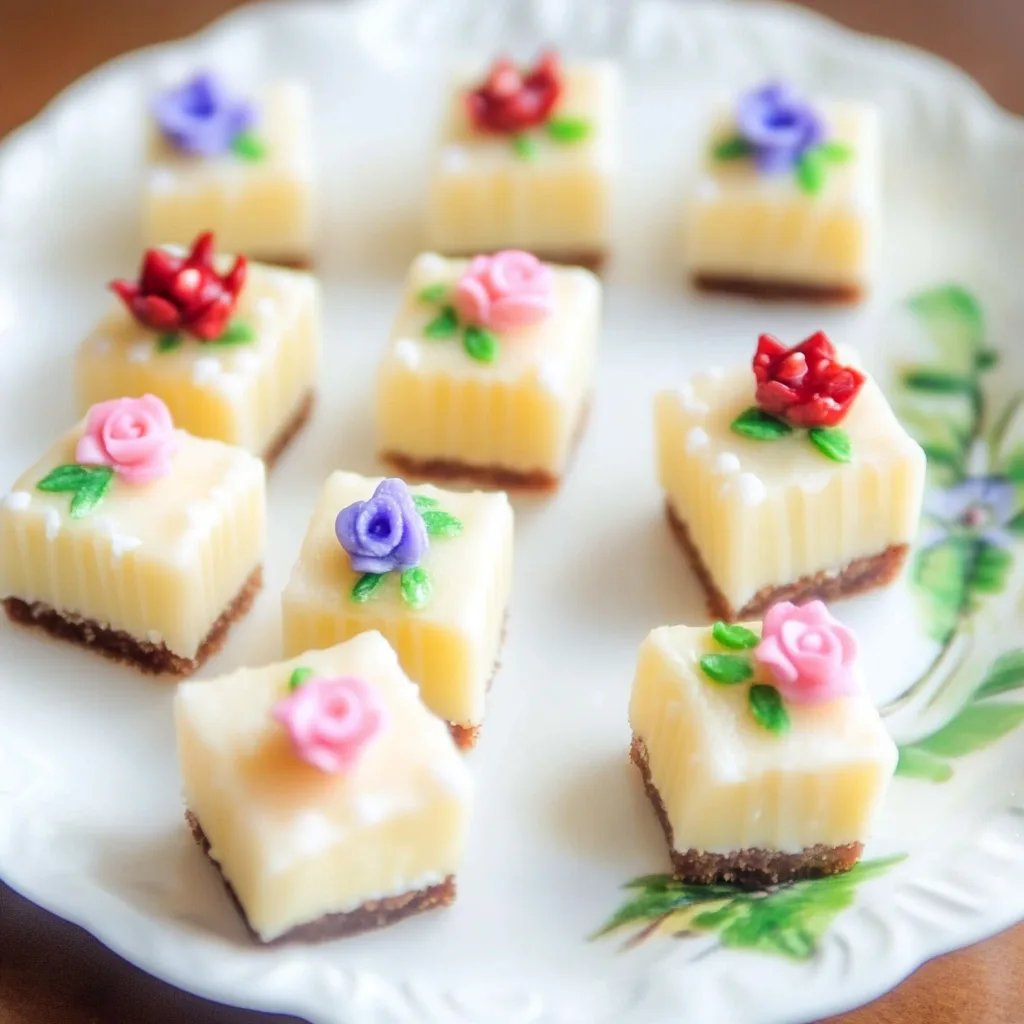
2. Visually Stunning – Their petite size and intricate designs make them the star of any desserts table.
3. Perfect for Gifting – Wrapped in decorative packaging, Petit Fours make thoughtful gifts for friends and family.
4. Impressive Presentation – Whether arranged on a tiered stand or a simple platter, they exude elegance.
5. Adaptable for Any Occasion – Suitable for holidays, weddings, or even casual gatherings, they are the perfect versatile dessert.
6. Perfect for Beginners – With simple instructions and techniques, you can create show-stopping treats even if you’re new to baking.
When you prepare these delightful Petit Fours, you are not merely making desserts; you are creating memorable moments filled with joy and sweetness!
Preparation and Cooking Time
Creating these Petit Fours does require some careful planning, but the timeline is manageable. Here’s a breakdown of the time you will need for the recipe:
– Preparation Time: 1 hour
– Baking Time: 30 minutes
– Cooling Time: 2 hours (for the cake)
– Decorating Time: 1 hour
In total, you should allocate around 4 hours and 30 minutes for the complete process, including cooling and decorating.
Ingredients
For the Cake:
– 1 ½ cups all-purpose flour
– 1 cup granulated sugar
– ½ cup unsalted butter, softened
– 2 large eggs
– ½ cup whole milk
– 1 tablespoon baking powder
– ½ teaspoon salt
– 1 teaspoon vanilla extract
For the Ganache:
– 1 cup heavy cream
– 8 oz semi-sweet chocolate, chopped
For the Fondant:
– 1 lb ready-to-use fondant
– Food coloring (optional)
For Decoration:
– Edible glitter, sprinkles, or decorations of choice
– Fresh fruits or flowers (for garnish)
Step-by-Step Instructions
Follow these detailed steps to create perfect Petit Fours:
1. Preheat the Oven: Start by preheating your oven to 350°F (175°C). Grease and line a baking pan (approximately 9×13 inches) with parchment paper.
2. Prepare the Batter: In a large bowl, cream together the softened butter and granulated sugar until light and fluffy. Add eggs one at a time, mixing well after each addition.
3. Mix the Dry Ingredients: In another bowl, sift together the all-purpose flour, baking powder, and salt.
4. Combine Mixtures: Gradually add the dry mixture to the wet ingredients, alternating with the milk and mixing until just combined. Stir in the vanilla extract.
5. Bake the Cake: Pour the batter into the prepared baking pan and spread it evenly. Bake for about 30 minutes or until a toothpick inserted in the center comes out clean.
6. Cool the Cake: Once baked, allow the cake to cool in the pan for about 10 minutes. Then, transfer it to a wire rack to cool completely — preferably for at least 2 hours.
7. Prepare the Ganache: In a saucepan, heat the heavy cream until it begins to simmer. Remove from heat, add the chopped chocolate, and let it sit for a few minutes. Stir until smooth.
8. Cut the Cake: Once the cake is completely cooled, slice it into squares or rectangles of your desired size.
9. Coat with Ganache: Dip each piece of cake in the ganache, allowing any excess to drip off. Place the coated cakes on a wire rack to set.
10. Prepare the Fondant: If using colored fondant, knead well and roll out thinly on a powdered sugar-dusted surface.
11. Cover the Cakes: Cut the fondant into squares that are slightly larger than the ganache-coated pieces. Drape the fondant over each piece, smoothing out the edges.
12. Decorate: Add edible glitter, sprinkles, or fresh fruit and flowers for decoration. Be creative with your designs!
How to Serve
Serving Petit Fours is an art in itself. To create an impressive presentation and elevate your gathering, consider the following tips:
1. Plating: Arrange the Petit Fours on a beautiful cake stand or tiered platter for a stunning display.
2. Accompaniments: Pair with a selection of herbal teas, coffee, or dessert wines. This enhances the tasting experience for your guests.
3. Serve with Care: Use a small spatula or fork to serve these delicate desserts, ensuring they remain intact while being enjoyed.
4. Garnishing: Consider adding fresh mint leaves or edible flowers to the serving platter for an added touch of elegance.
5. Storage Tips: If not serving immediately, store the Petit Fours in a cool, dry place or refrigerate for up to three days. Allow them to come to room temperature before serving for the best taste.
By following these serving tips and showcasing your creations beautifully, your Petit Fours are sure to be the highlight of the event.
Additional Tips
– Experiment with Flavors: You can infuse your batter with different extracts, such as almond or orange, to create unique flavors for your Petit Fours.
– Use a Serrated Knife: When cutting the cake, a serrated knife helps achieve cleaner, more precise edges without crumbling.
– Be Patient with Cooling: Allow the cake to cool completely before icing and decorating to prevent melting or warping the fondant.
– Practice Fondant Techniques: If you are new to using fondant, practice rolling it out and draping it over a few test pieces to get comfortable before working on your final Petit Fours.
Recipe Variation
Get creative with these delightful variations to take your Petit Fours to the next level:
1. Chocolate Raspberry: Incorporate raspberry puree into the ganache for a fruity twist.
2. Lemon Zest: Add lemon zest to the batter for a refreshing, citrusy flavor.
3. Nutty Delight: Incorporate crushed nuts into your cake batter or use them as a decorative topping.
4. Layered Petit Fours: Make different flavored cakes and layer them with different fillings for a multi-flavor bite.
Freezing and Storage
– Storage: Keep your Petit Fours in an airtight container at room temperature for up to three days. This will maintain their freshness and texture.
– Freezing: To freeze, wrap each Petit Four tightly in plastic wrap and place them in a freezer-safe container. They can be kept frozen for up to two months. Thaw at room temperature before serving.
Special Equipment
Having the right tools can greatly enhance your Petit Fours-making experience. Here’s what you’ll need:
– Baking Pan: A 9×13 inch pan is ideal for baking the cake layer.
– Wire Rack: Essential for cooling the cake and allowing excess ganache to drip off.
– Rolling Pin: Useful for rolling out fondant smoothly.
– Piping Bags: If you want to add decorative touches or designs to your Petit Fours, these are invaluable.
– Pastry Cutter or Sharp Knife: For cutting the cakes into uniform pieces.
Frequently Asked Questions
Can I use store-bought fondant instead of making my own?
Yes, store-bought fondant saves time and can be just as effective for covering your Petit Fours.
What types of fillings can I use in my Petit Fours?
Common fillings include custards, fruit preserves, or buttercream. Get creative with flavors that suit your taste!
How can I prevent my ganache from becoming too thick?
If your ganache is too thick for dipping, gently warm it to achieve the desired consistency.
Can I decorate Petit Fours in advance?
While you can prepare the cake and coat it with ganache in advance, it’s best to decorate with fondant close to serving time for optimal freshness.
What’s the best way to serve Petit Fours at a party?
Arrange them on a tiered cake stand for a stunning visual presentation. Guests will be drawn to the beautiful display!
Conclusion
Crafting Petit Fours is more than just baking; it’s an art that brings joy and elegance to any occasion. With their endless flavor possibilities and exquisite presentations, these sweet treats are perfect for all gatherings. Whether it’s a wedding, baby shower, or a simple afternoon tea, but the effort invested is guaranteed to be rewarded with delightful smiles.